

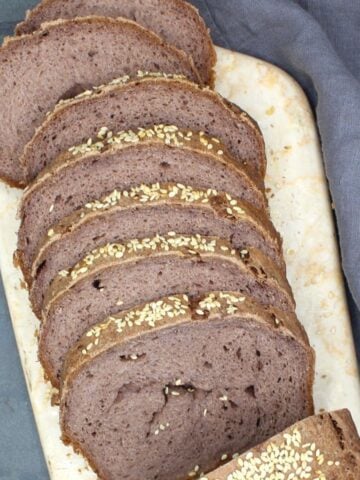
This whole wheat baguette recipe is healthier because it uses all whole wheat flour, but it tastes just as good as any French bread you might buy at the bakery. You need four pantry ingredients and it's ready from scratch in about four hours.

Foolproof whole wheat French bread recipe
Years ago, I indulged our shared love for baking and eating bread with a healthier French bread recipe made with a 3:2 mix of whole wheat flour and all-purpose flour. That recipe has lived on the blog since 2009, but I've since tweaked it to make this bread with only whole wheat flour. Now, I give you this nutritionally improved, 100 percent wholegrain but still delicious, light and airy whole wheat French bread!
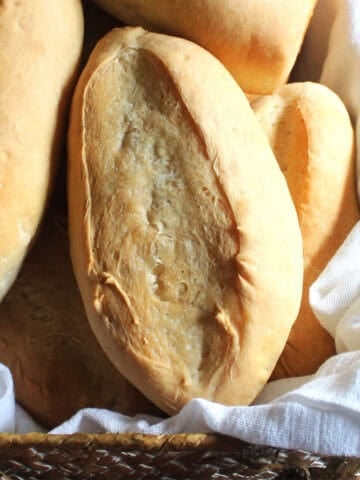
French bread is one of the easiest breads to bake, and almost anyone can make a pretty decent loaf with a little practice. Most classic French breads, like my easy French bread, need only two or three pantry-friendly ingredients. This whole wheat French bread is almost as easy, but it does require one more ingredient - vital wheat gluten - and slightly longer rise times.
The vital wheat gluten gives the wholegrain dough a helping hand by making up for the reduced gluten in whole wheat flour. If that's confusing, let me break it down a bit for you:
- Refined flours like all purpose flour and bread flour are made by milling only the endosperm or the starchy interior of the wheat kernel after it has been stripped of its outer coating, called the bran, and the seed embryo, called the germ. The endosperm is the part of the kernel that contains two key proteins that form gluten.
- Whole wheat flour is made by milling the whole wheat kernel. So it includes the protein-rich endosperm but it also includes the bran and the germ. The bran and the germ don't contain proteins - instead they are rich in fiber and vitamins. As a result whole wheat flour is better for you than refined flour but it isn't so great for baking because measure for measure it has less gluten-forming proteins than all-purpose flour does.
Gluten is critical in baking bread because it gives the dough lift and structure. By adding vital wheat gluten - a concentrated wheat protein made by removing all starch from wheat flour - to this recipe, we can ensure our French bread will have great structure and texture.
The wholegrain dough will also take a little longer to rise than a white flour bread dough would. I factor in about an hour and a half for the first rise and another hour for the second. If you add in 30 minutes of baking time, you can still have a delicious loaf of French bread - one your family will love and one you know is good for them - on the table in under four hours.
If you love baking bread, you might also enjoy these recipes for sourdough French bread and French-style crusty Mexican rolls, bolillos. You can also browse many more made-from-scratch bread recipes in my collection of all the bread recipes you'll need.
Recipe card

Whole Wheat French Bread (Baguette)
Ingredients
- 1 cup lukewarm water
- 2 ¼ teaspoon yeast
- 1 teaspoon sugar
- 2½ cups whole-wheat flour
- 1 tablespoon vital wheat gluten
- ¾ teaspoon salt (tweak salt according to taste)
Instructions
Make the dough
- Mix the water, yeast and sugar in a large bowl. Let stand for a few minutes until the mixture becomes quite bubbly, about 5-10 minutes.

- Add the flour, vital wheat gluten and salt to the yeast.
- Mix to combine and then knead by hand about 10 minutes or in a stand mixer set to medium speed for eight minutes until you have a very smooth, elastic dough.


First proof
- Form the dough into a ball and place in an oiled bowl, turning over once to coat the top with oil. Cover with a lid or cling wrap and set aside to rise in a warm spot, like a cold oven with the light turned on, for 1½ to 2 hours.
- After this first proof, the dough should have doubled. Turn it over so the smooth top is down, then use your fist to deflate the dough and punch it into a circle, about 8-10 inches in diameter.


Form the baguette
- Begin rolling the dough, pressing in the seams thoroughly with your knuckles or the heel of your hand, until you have a long cylinder.
- Roll the cylinder of dough, using your palms to taper the ends, to get a baguette shaped loaf that's about 12 inches long.


Second proof
- Place the loaf on an unoiled baking sheet, seam side down. Cover loosely with a kitchen towel and set aside in a warm spot for an hour or until the loaf is puffy and has doubled in size.

Score and bake
- Preheat the oven to 450 degrees Fahrenheit/232 degrees Celsius. Place a baking pan with water on the lowest rack and position another rack in the center of the oven.
- Use a sharp knife or bread lame to make three long, diagonal cuts in the top of the risen loaf.
- Place the French bread loaf in the oven and immediately reduce heat to 425 degrees Fahrenheit/220 degrees Celsius. Bake 30 minutes until loaf is golden brown. Let the bread cool thoroughly on a wire rack before cutting into slices.

Nutrition Information
To print recipe card without images, uncheck "instruction images" after clicking the "print recipe" button.

Whole wheat French baguette FAQs
Yes, you absolutely can double all ingredients in this recipe to make two loaves, except the yeast. Increase yeast by ¼ teaspoon for a total of 2 ½ teaspoons.
You can, but you might need to give the dough more time to proof and the loaf won't be as airy. If you can't use vital wheat gluten, substitute a cup of the whole wheat flour with bread flour or all-purpose flour.
This whole wheat French baguette stores beautifully. You can refrigerate it after making for up to a week. You can also freeze it, tightly wrapped in freezer-safe wrap, for up to six months. Reheat refrigerated and frozen bread in a 350 degrees F/180 degrees C oven until warmed through and fresh again.
First published on Sep. 1, 2009. Updated and re-published on Jan. 9, 2026.


SugarLoaf says
Texture perfect, but taste was a bit too salty.
Vaishali says
You can use as much or as little salt as you like.
Vaishali says
You can change the salt per your requirements and taste!
Dawn Adams says
I would like to make 100% whole wheat French Bread. Should I just add an additional 3/4-1 Tbsp Vital Wheat Gluten ?
Vaishali Honawar says
I've updated the recipe to make it 100 percent whole wheat with added vital wheat gluten.
Alfredia says
How do you adjust this recipe using instant yeast? Thank you.
Vaishali Honawar says
Use the same amount of instant yeast!
Alfredia says
How do you adjust this recipe using instant yeast? I’m a novice and have not been able to get results with active years. Thank you.
Jaanaki says
Vaishali,
Tried this recipe for the first time and the bread came out very well.
Vaishali says
Awesome!
Qmac says
After rolling and pressing with your knuckles, do I flatten the dough and repeat 2 times or just fold it again 2 times? Thanks in advance.
Vaishali says
Just fold it again two times into a cylinder. Press the seam closed each time.
Patricia says
Made garlic bread with this last night - it was a big hit! I also used only 2 tsp salt, which was perfect for the garlic bread. And I had a ramekin of water in the back of the oven which only half evaporated by the time the bread was done.
Thanks for the egg-free recipe! It was just what I was looking for.
Vaishali says
Hi Patricia, so glad you tried the bread and liked it. Garlic bread sounds super-delicious. Thanks for letting me know!
Patricia says
Thanks for posting this wonderful how-to! I've had to cut eggs out of my diet which meant I couldn't use my usual french bread recipe. This one turned out wonderfully! I sliced it up and made garlic bread for my dinner party and it was a hit!
I also used only 2 tsp salt and it was perfect for the garlic bread.
Kristen says
I enjoyed making this recipe; although I had to take a break and let it rise in the refrigerator due to time constraints. Anyhow, my only concern is 1 1/2 tbsp. is a lot of salt! I cut it back to 2 tsp and this is still too much. Will try 1 tsp for 2 loaves of bread. Thanks for the base recipe!
Vaishali says
You're welcome. And it's 1 1/2 teaspoons, not tablespoons. Also, salt measurements are suggested -- you should adjust to taste.
Anonymous says
Found your website and this recipe last night. Made the without wheat gluten version but will try the other next time. Turned out great. Delicious. Thanks!
Vaishali Honawar says
So happy to hear!
Vaishali says
Rachel, Salt is one of those ingredients you can adjust to your liking-- even in baking. If you find it to be too much, feel free to use less.
Mia and Deniece, Boulder Creek Cupcakes says
what happens if I don't have the wheat gluten? will it turn out really dense? Looks yummy and really want to give it a try, but I'm scared about not having the gluten....
Vaishali says
Without gluten, I would recommend using 2 cups of whole-wheat and 3 cups of all-purpose. That should keep it from getting too dense.
Ila Patel. says
Hi Vaishali,I love ur recipes. I tried the french bread recipe & just cOuldnt believe how wonderful it came out, as i am not a baker.My 2 1/2 yrs old daughter loves croissant. can u please post delicious whole wheat recipe.Thanks. Ila.
Vaishali Honawar says
Hi Ila, Thanks for your kind words-- glad you liked the recipe. Your daughter sounds so sweet. I've been wanting to make a croissant and will try to come up with a whole-wheat one.
Janhavi says
I made this bread today. instead of two loaves, i made second fucaccia,i added some rosemery,sun dried tomatos,both turned out excellent, thanks for sharing such wonderful recipe.
AgnostiChica says
I may be the only one who didnt get this right the first time. But I did learn a lesson from it. I halved the recipe and goofed up the amount of salt. The yeast proofed fine but the dough didnt rise satisfactorily. I was puzzled and kept re-reading your fantastically detailed post. Then I tasted the bread and the excess salt. Somewhere from the recesses of my brain, a few microbiology lessons from my past beckoned. Salt kills/inhibits yeast activity! Tried it again today and followed your recipe to the letter and viola! Beautiful French bread 🙂
Sorry for the long comment, maybe someone could learn from my mistake!
nwebster84 says
I'd never baked any kind of bread before. It worked better than I'd hoped, and I followed instructions to the letter (except I added a little extra water when kneading the dough).
Joshua says
I can't believe how easy it was to make this. It came out perfect on my first try. The recipe really has everything in perfect proportions. The pictures were also very helpful for someone like me who doesn't do much baking. Thanks.
Vaishali says
Kevin, it's the slow stuff and is labeled "active dry yeast."