

A foolproof recipe to make your own, homemade Italian ciabatta bread in under four hours!
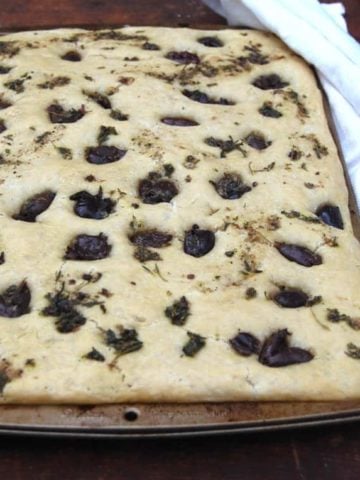
You might also like these recipes for Italian bread and Tuscan bread.
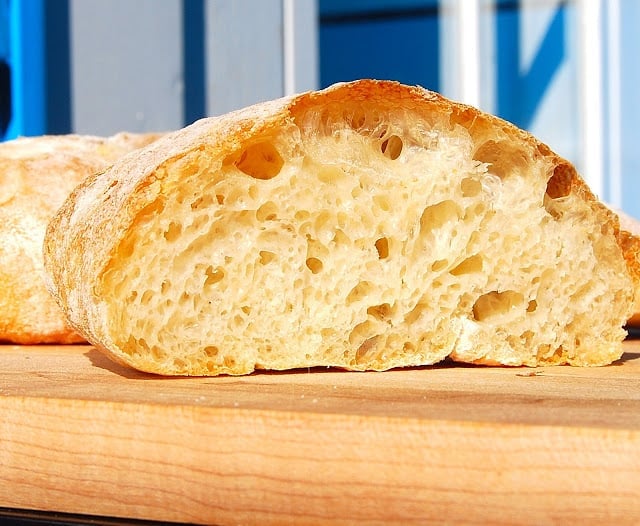
Ciabatta is my favorite Italian bread, but it is not always the easiest and quickest bread to make, even for a seasoned baker.
The dough is rather wet and sticky and can seem impossible to work with when you're new to the process, but that wet stickiness is also vital to the light, bubbly, airy texture of this bread.
This also is a bread that requires some planning ahead because you need to let the starter stand overnight or at least several hours. And planning ahead is not my favorite thing to do.
I was resigned to making ciabatta only when I have the time, which is not often, until I came upon a great technique that cuts down the waiting significantly.
The initial rise time for this ciabatta is under two hours, and the second rise is just about an hour. So in under four hours, including prep and baking time, you are rewarded with a fluffy, crusty, delicious bread that you won't be able to stop dunking in olive oil and popping into your mouth.
More vegan bread recipes
Recipe card
Quick Ciabatta
Ingredients
- 4 cups all-purpose flour
- 2 ¼ teaspoon active dry yeast
- 2 ¼ cups warm (not hot) water (you might need more if you are in a dryer area)
- 1 teaspoon salt
- ¼ teaspoon sugar (not usually found in traditional ciabatta, but it really helps speed the rise)
Instructions
- Mix the sugar, water and yeast in a bowl and set aside for five minutes for the yeast to start working.
- Add the flour and salt and mix in a stand mixer fitted with a paddle. You want the mixture to be just slightly thicker than a pancake batter-- it should definitely not pull together into a firm dough.
- Let the mixture stand for about 15 minutes. Then turn on the stand mixer to a medium-high setting. After about six minutes, the dough will start to make a flapping sound and start rising up the sides of the bowl.
- At this point, switch the paddle for the dough hook and knead for another six to seven minutes until the dough starts pulling cleanly off the sides of the bowl. It will be smooth at this stage but still very sticky and loose.
- Grease a bowl and pour the dough into it. Cover with a plastic wrap or kitchen towel and place in a warm spot, like an oven with the pilot light on.
- In about 1 ½ to 2 hours, the dough would have tripled.
- Prepare a cookie sheet by lining it with parchment paper and then dusting the paper liberally with flour.
- Pour the dough out of the bowl and into the center of the cookie sheet. Dust the top with flour.
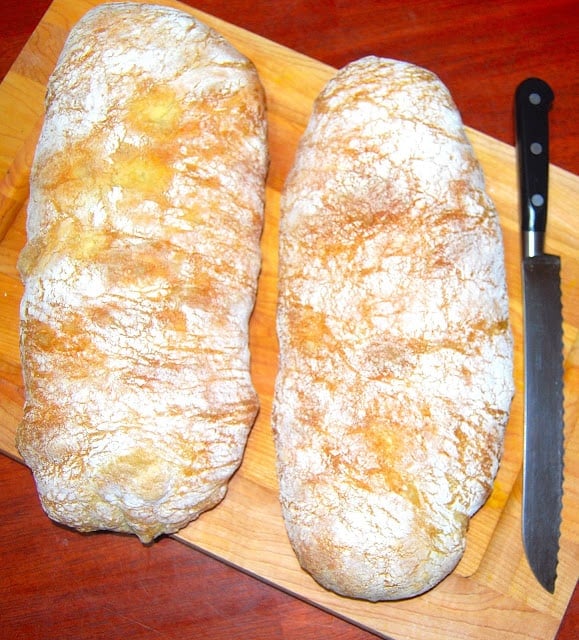
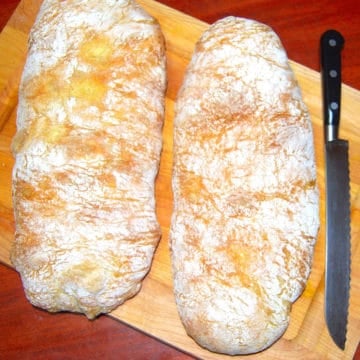
- Using a bench scraper, divide the dough into two pieces. Using the bench scraper and a wet hand if needed, shape the dough, tucking the irregular pieces underneath, until you have two flat logs. The logs should be about six inches apart. This is a rustic bread, and the wet dough is not going to hold a definite shape, so don't even try for a beautiful, even look. This is known as an Italian slipper bread for a reason. The baked bread will turn out absolutely gorgeous, trust me, with a translucent, lit-from-within look and those gorgeous air holes.
- Dust some more flour over the logs, then cover them with a loose kitchen towel and place in a warm spot for about an hour or until the logs are risen and all puffy-looking.
- About half an hour before baking, place a pizza stone or baking stone on the middle rack and preheat the oven to 500 degrees Fahrenheit. Place an empty, oven-safe pan on the bottom rack before preheating, then carefully add a cup of water to it just before you place the bread in the oven.
- Place the ciabatta loaves directly on the baking stone by sliding the parchment off your cookie sheet. If you are not confident about doing this, just place the entire baking sheet on top of the baking stone.
- Bake for 25 minutes or until the loaves are golden-brown and the bottom sounds hollow then tapped.
- Cool thoroughly on a rack.
Nutrition Information
To print recipe card without images, uncheck "instruction images" after clicking the "print recipe" button.


Missy says
One of my favorite easiest go-to bread recipes! If I want a little more depth of flavor I add some sourdough starter about 2 tbs (fed or unfed doesn't matter) and just reduce the water a little bit.
Vaishali Honawar says
What a terrific idea! ❤️
Diane Shaner says
I want to try this recipe but I don't have either a pizza stone or a baking stone. Will the Ciabatta bread still turn out if I just bake on a cookie sheet
Vaishali Honawar says
Yes, you can use a cookie sheet, just be sure to let it sit in the oven for a few minutes so it's hot before you put the unbaked bread on it.
Phil says
Can this be made using 50% ot 100% whole wheat flour?
Anonymous says
I love this bread, but the baking time for me is a lot less than 25 minutes, if I cooked it that long the crust would be way too hard and maybe burnt. Also have to adjust the flour because it's too wet at the specified ratios, but I've gotten some experience making the bread and I'm pretty good at judging the moisture content now. Wish there was some way other than fiddling and experience to get the right ratio but that's the way of the bread!
Bo says
as much i enjoy my homemade crusty bread i always dread the shaping part bc the experience can be pretty inconsistent due to wet dough. i always do it on my wooden pastry board and sometimes i have an easier time sometimes it just sends me into a rage bc STICKY! thanks to this recipe now i know i can actually just do it straight in the pan it was so easy!
1) when using the paddle i never saw dough climbing up the bowl
2) i overproofed it a lil bit but not a big deal
3) did i mention how easy and satisfying the shaping process was? it actually took no effort at all to make it look pretty
4) this makes 2 gigantic loaves that fit perfectly in a half sheet
Vaishali says
Hi Bo, thanks for the feedback and so happy you enjoyed the ciabatta. I love the shaping part too - freeform works for me lol.
Alice says
I used this as a guide to make ciabatta rolls for work when our baker wasn't able to supply rolls for our popular breakfast buns! I multiplied the recipe by 4 to make about 32 buns. Worked well! I baked them for 25 min which seemed to work even though they were smaller. 15 at 400F with fan on and water in bottom of tray, 10 at 350 with fan off and removed water. This baking strategy was suggested by another recipe. No idea if it was a good idea but the rolls turned out well 🙂
David says
Made this exactly as said, needed to add an extra cup of flour no doubt. 4 is like soup.
Anonymous says
I think I messed this up about 5 different ways but it still came out pretty good.
Samantha says
I don’t know what to do about baking it because my oven doesn’t go to 500F. Any suggestions?
Vaishali says
Hi Samantha, how high does it go? You won't get the same results at a lower temp but you might still get decent bread.
Monica from Australia says
This recipe is fantastic. I have made this bread many times despite the fact I only have a small portable electric over, which I set at 220 C and just bake it for about 27 to 28 minutes. The only problem is that there is just two of us at home, so my question is weather the dough can be refrigerated or even frozen and if yes, at what point of the process this should be done.
Vaishali says
Hi Monica, you can freeze the dough after the first rise. You can also just freeze the bread loaves.
Missy says
I cut the recipe in half with no problem all the time there's only 2 of us as well!!
Desiree says
Hi! If I make this recipe using fresh yeast instead of active dry yeast, how much should I use? Thanks!
Andrew D says
This turned out absolutely perfect. Thank you!
Vaishali says
So great to hear, Andrew! Happy you tried it.
Carole from Canada says
Just me again with another question. If 2 loaves are approximately 10 " long and should be spaced 6" apart, what size cookie sheet do you use. Is it oversized? I can get the length of roughly 10" no problem but my cookie sheet doesn't allow for 6" apart. They butt up against each other.
Vaishali says
Hi Carole, A standard size cookie sheet--about 26 inches by 18 inches, should be fine. If the loaves touch after they rise just pull them apart after baking.
Carole from Canada says
Thanks again for your quick response. I did slice them apart.
Jeff says
Tried this for the first time. Didn't have the pizza stone, but otherwise followed the recipe. Turned out great! Looking forward to trying a full ciabatta recipe, but definitely keeping this one... One of the best breads I've made.
Vaishali says
So happy to hear, Jeff!
Carole from Canada says
I got down to the slapping sound part and all was O.K. but when I switched over to the dough hook, the sticky dough never pulled off the sides of the bowl cleanly. It just stuck like crazy.
Any thoughts?
Vaishali says
Hard to say for sure but you probably need more moisture in the dough.
Carole from Canada says
Thank you for all the questions you answer so quickly to help us.
I found out my problems. 1..I didn't use the paddle at a fast enough speed.2..I didn't run the dough hook long enough. 3. My yeast wasn't proofing very fast so got a newer one.
RESULT: It work and was beautiful and light with holes. Made 2 gigantic loaves. I like using the all purpose flour. Bread is not so dense and overly chewy. Love it.
Vaishali says
Awesome, so happy you figured it out. 🙂
Carole from Canada says
Just wondering how long each loaf would/or should be?
Vaishali says
Hi Carole, I'd say you can make them approx 10 inches long, although it doesn't really matter for the final outcome.
Marti Avolicino says
Why did my ciabatta come out brown instead of white?
Vaishali says
It could have been the flour you used. Or the oven could have been too hot.
Tony Dee says
What an awesome
recipe! The bread came out phenomenal. This is a keeper-
Thanks for sharing!!
Vaishali says
Hi Tony, so happy you loved it.
Melissa says
You can cut this recipe in half no problem if you only want one loaf! This time I added a tsp of vital wheat gluten and subbed some buttermilk in for some of the water! Great! Tastes almost like a sourdough! Also I have a 6 inch round springform pan and decided to do 2nd rise and bake in there! Great! I got a nice tall round loaf for variety! Fyi- This is my most requested bread! Love it
Vaishali says
So happy to hear, Melissa. Thanks for sharing your great tips!
Liz says
LOVE this recipe. How can we substitute your starter for some of the dry yeast?
Vaishali says
Hi Liz, I have not used a sourdough starter to make ciabatta, but here are some ideas: use 3/4 cup starter and cut down flour to 3 1/2 cups. Reduce water to 1 3/4ths cup. You can add a teaspoon of yeast if you want to be safe, but I think you can skip it, if you use a recently fed, strong starter. Your first rise would have to be long--overnight or at least 10-12 hours. The second rise would prob need about 2 hours. Hope this helps.
Beth says
I didn’t have huge holes in the bread like I wanted to. There were holes and it rose, etc, but i want those artisan big holes. Any suggestions?
Missy says
You may have used too much flour. I've made this no lie prob 1000X ! Its a damned it you do damned if you don't situation. Too much flour = smaller holes but higher loaf! Less flour = bigger holes flat loaf! I adjust the flour for whatever I'm making for! It is a STICKY dough! I grease my hands to work with it
Melissa says
LOVE THIS RECIPE! I've used it for YEARS!! You can play w/the water to flour ratio depending on if you want a firmer bread = more flour or lighter more airy bread = less flour! You can also play w/sugar salt amount depending on taste. First rise I never do more than an hour ( I only use instant yeast)
Its a STICKY dough! Grease hands and a bench scraper is your BFF with this dough! You can cut this into rolls easily w/scraper. Work fast and make often and you will become a pro! Ps Less is more! Dont fondle it too much after 1st rise!! Dump..flip, flip is good! If you play with it too much you could get flat bread...really flat!
Vaishali says
Love those tips, Melissa, thanks for sharing!
Lexi says
Any tips for making this when i dont have a stand mixer/ is it possible?
Vaishali says
Hi Lexi, you can mix the dough by hand but it will need a good amount of kneading. Just knead by hand until you have a smooth but loose and sticky dough (step 4).
Rob says
Hi, please can you clarify the measurements? When using the metric measurements it shows 480g flour to over 500ml water which can't be correct as that's over 100% hydration. Thanks!
Jon.G says
I upped the flour to 530g and kept the water to 500ml. I thought the %hydration level was really high, but once you go through the paddle beating and dough hook session the dough completely changes. I make a lot of pizza dough and never go beyond 65% hydration but this is next level stuff. Use plenty of flour when shaping and leaving to prove else it'll stick. They look flat when they go into the oven but puff up beautifully.
Elli says
What mixing speed should the bread hook be on?
Vaishali says
Medium--around four would be fine.
Andrea says
What do should you do if you do not have a baking stone?
Vaishali says
Just use a baking sheet.
Jennifer says
Incredible recipe with fantastic results. I've made this twice this week. We are so impressed with it that I'm dumping my previous artisan recipe which was decent but not as delicious and airy as this. Thank you for providing such a simple recipe that is ready to bake the same day.
Vaishali says
Hi Jennifer, so happy to hear.
Nicholas Fazio says
Can you post weight measurements. Or ratio.
Marion says
Hi,
Ive started making it but realise the high temperature needed to cook…. It says 500 degrees but my oven only goes as high at 220 degrees- what should I do??
Vaishali says
Hi Marion, your temps are prob marked in celsius-- mine are in Fahrenheit. 220 degrees C is about 425 Fahrenheit. That could still be a bit low for the ciabatta because it needs a strong burst of heat, but you could try setting your oven to the highest point and see if it works.